Sunday, July 19, 2009

Before & After- Part Two

Hello,
Well, I didn't have any guesses on what the mystery item was in my previous post... If anyone has any guesses- please share!

I have two more items I made over in the past week: Go over to Southern Hospitality or Between Naps on the Porch to check out some other great finds this week.

1. The first item has been hanging in my bedroom forever (I thought about it- and I remember buying it when my niece was a baby, and she is nine now). It matched the previous decor of shabby roses. It wasn't bad- just dated and out of place.


I then used some pliers and pulled out all of the green ribbon, and popped off the buttons.

Now, I wasn't sure if I should strip the board, or just cover over it. I decided to cover over it- it seemed easier. Used this brown fabric I found. Was going to try burlap, but I was afraid it would be too "manly" for this project. My heavy-duty stapler was NOWHERE to be found (think it is in my classroom somewhere), so I bought out my glue gun instead. Easy Peasy!

The last two steps were the hardest. I then used this chocolate colored silky ribbon on the front. I know it is a bit off in spots, but I tried to get it on evenly. It took forever! Finally gave up and just glued it in frustration. Then, I had pealed the fabric off of the buttons, and decided to glue them back on uncovered. The easiness of the project finally returned. Here are the results:

Total cost: $5.00!

Project two is my favorite one yet....
2. My dh & I had gone on an adventure to "the big city" recently to shop around and such. Well, any trip to the big city now has to involve a trip to the Goodwill Clearance Center. I have to say that for 2:00 on a Thursday, it was surprisingly crowded. Crowded with stingy wolves! People were shoving, snatching, and being all around scary folks. Lucky for me, they were not looking for the same things I was looking for.

S0, I found this owl first thing, along with this heavy wooden frame, a Victoria Secret Pink makeup bag (not pictured, but in my purse holding all of my misc things) and a big round wooden ball (see future post) for only $4.00. I was excited. I had planned to use the owl in a different project, and the frame for something else too, but as I waited in line, I had a vision...

I decided to paint the frame dark brown, and take out the glass. I used the same brown fabric from my picture board and glued it to the cardboard. Then, I sprayed the owl with a cream colored spray paint. Had to bend his ears and bottom a bit to make him fit, but here is the end result.


Not bad in my book! So, what do you think?

Friday, July 17, 2009

Before and After- Part One

Well,
Sadly for me, the summer is winding down. I go back to school soon, so I have been trying to finish up some projects around the house.

I am going to put a few things up today, and have a few more posts to follow. I also have 2 quandaries that I need help with...

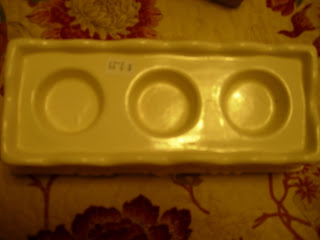
The first- does anyone have an idea what this is? I found it for .50 on Goodwill's 1/2 off day and thought I could use it to display a chalkboard tray, but that doesn't work. What should I do with it? My next quandry will come with my part two post. Thanks for the ideas!


So, I had this vase- thought it was a bit boring...

Then I made a moss ball and put it on top...
(don't know why it is sideways)

Still thought it was a bit bland, so I sprayed the vase white and here is the result
(again, turn your head sideways lol).

So, here is my final result, along with my .99 iron cheese display (with bird nest & eggs) and my .50 silver chalkboard tray and .50 iron display. It was originally a cheap gold color- but a bit of white helped it out.


I really like how it turned out! Thinking about maybe changing the tray holder color, but I am not sure what I should change it to. I spray painted the iron cheese display is a dark brown (it was blue), but I think that would be too much for the tray holder. Oh well... I am pleased with how it turned out.

Be on the look out for part two soon!

Check out all of the other thrifty finds over at Southern Hospitality :) or the great makeovers at Between Naps on the Porch

Tuesday, July 14, 2009

Tasty Tuesday: Family Recipe: Pepper Rice

I know you are thinking- pepper rice.  That must be hot & spicy.  Nope- doesn't have to be.  I make this with sweet banana peppers, but you could use others if you are braver than me.  This is perfect to use those pepper that are springing up in gardens everywhere.  I am giving you the recipe the way my mom & grandma make it, but I personally think it needs a bit more milk in the last 20-30 minutes of cooking time (I just stir it around and add more milk to make it creamy) and I cook it usually for about 20-30 minutes longer than the recipe says (my rice never gets done in that short of a time, but my mom's rice does).  


Anyway, now to my recipe:

Pepper Rice

1 cup uncooked converted long grain rice or brown rice

  1. Preheat oven to 350 degrees.
  2. Mix everything in a 2 quart casserole using the milk to rinse out the soup can.
  3. Stir halfway through, be sure to stir all the way to the bottom.
  4. Add more liquid if it starts to dry out before rice is done.
  5. Cook for 30 to 40 minutes until rice is tender (I usually have to cook for closer to an hour- I just taste a piece of rice at the 30 minute mark, and that is when I usually stir it around and add more milk).  I would continue to stir every 10 minutes or so and taste, but that is just me.  
So, hop on over to Jen's blog at Balancing Beauty and Bedlam to see a ton of other tasty recipes! 

Sunday, July 12, 2009

~Thrifty Finds~ Shopping in my own House

Today I decided to share two projects that came from my own house.  My hubby and I did manage to pick up a few things at the Goodwill 50% off sale, but no photos yet (guess that will come next week).  Also bought some CUTE things at the Goodwill clearance center in "the big city" including a tin owl and a shabby frame for some vintage keys from dh's grandfather.  Will post pics soon. 

I have been redoing my bedroom.  I used to have more of the "Shabby Chic" green & pink look.  In the past few months, I have moved towards browns/reds/cremes/some greens.  

I had these cubes that I had gotten from Target forever ago for super cheap.  They were holding some old photos and not very cute.  They were a shabby green

I sprayed them grey, then gave them a coat of brown.  Getting better!

Then, I went to Hobby Lobby & got the cutest white paper.  Cut it out to fit the back.  


Then sprayed it brown.  Love them now!!!  I need to flip the paper around on the smaller one- accidently sprayed the wrong side instead of the glossy one.  


I had bought the white paper to cover these frames:


I also got them at Target for cheap after an Easter clearance one year.  Liked them, but they didn't fit anymore.  I had also bought a brown/creme printed paper for the back of the boxes- but since I used the white on them, I decided to try and use the print paper on the frames.  After a few swipes of my glue stick, here is what I ended up with.  


Not bad for under $5.00!!!  

Join us over at Southern Hospitality and check out all of the thrifty finds this week! 

Saturday, July 11, 2009

Crazy Cat Lady Issues....

Well, I can admit it- I am a crazy cat lady.  Petsmart sends my kitties birthday cards, and they have tons of toys. Up until this point- they have been in an old rubbermaid shoebox on my dryer and all over the house.  It has been driving me crazy (see crazy cat lady title above :) ).  I have had my eye out for a solution... I knew I wanted something that could go in the living room. 

Well, when I was in Texas, I found a GREAT store!  It is called Berry Good Buys.   All of the money goes to domestic violence victims in the Tarrant County area.  They also provide a place for people who have escaped a bad situation to shop and replace items they may have had to leave behind.  Who wouldn't want to support that??? 

So, I went in with high hopes- and found some great deals.  All of their pants were on sale for $1.00- I bought two pairs of maternity pants to put away for someday (hopefully someday soon).  Also grabbed a cute ivy planter/display for $4.00 (will post picture when I post pics of my kitchen redo), and the best part- my new kitty toy holder!!!!  I had to stand outside for a few minutes before they opened, and it was love at first sight.  It was a bit more than I usually spend ($5.00), but I knew I was supporting a great cause.  

So, here is the container I found:

close up pic


I then spent about 20 minutes gathering up most of the toys in the house...


and found a new spot for them in the living room


To me, not bad for $5.00.  I have debated brushing some brown glaze on the outside to where it will be less white and more creme, but I don't want to ruin it.  In the days since, I have found more toys around and it is almost full.  Yes, we need a 12 step program! Especially since they play with water bottle caps most of the time...

Wednesday, July 8, 2009

WFMW: Freezing Fruit


Hi :)  I am joining Works for Me Wednesday on We Are THAT Family


I was ecstatic when I found strawberries for .99 at Aldi recently- We had sugared strawberries, strawberry shortcake, and chocolate dipped strawberries.  Soon, we were tired of them.  I looked at them and had a brainstorm- I should freeze some for later in the year when strawberries are expensive.

As I started to get to work, I thought about how I really dislike the bagged strawberries I usually buy because they take forever to crush in my blender when I make smoothies.  So, I took about 10 minutes and cut my strawberries into pieces.  Not tiny pieces, but in fourths.  Then I took my cookie sheet, covered it in foil and put the pieces in the freezer.  Then when they were frozen, I transferred them into a gallon ziplock bag.  Now I have a ton of strawberries for about 4.00! 

I think I am going to do the same thing with the pineapple that is .99 this week.  I want to  find a sale on peaches to freeze.  Hopefully I can have a freezer full of food for the fall/winter.  Hopefully this tip helps you :)

Tuesday, July 7, 2009

You Will Love Them: Roasted Toasted Green Beans


Now, I know what you are thinking- roasted what????  

Yes, green beans.  They are delicious- in fact, I could probably eat them every day and not tire of them.  Even people who think they don't like green beans end up trying these and loving them.  Give them a shot.  

Roasted Green Beans 

  • 2 lbs green beans
  • 1-2 tablespoon olive oil (or just enough to lightly coat beans)- I usually use canola oil. 
  • 1 teaspoon kosher salt (or to taste, may substitute with Mrs. Dash if desired)
  • 1/2 teaspoon fresh ground pepper (or to taste, omit if using Mrs. Dash)
  1. Preheat oven to 400°F.
  2. Wash, dry well, and trim green beans.
  3. Put green beans on a jelly roll pan.
  4. Drizzle with olive oil.
  5. Sprinkle with salt and pepper to taste (I have even used garlic salt with good results, or Mrs. Dash). 
  6. Use your hands to be sure all the beans are evenly coated and spread them out into 1 layer.
  7. Roast for 20-25 minutes, turning after 15 minutes, until beans are fairly brown in spots and somewhat shriveled.  They will look burned, but they are not.  That is just the deliciousness coming out :) 
  8. Serve hot or at room temperature.
So, check out Jen's blog "Balancing Beauty and Bedlam" and find some tasty recipes! 

Tuesday, June 30, 2009

Works For Me Wednesday Summer Recipe


Well, I have read this for about six months now, and I finally decided to participate :) If you haven't already... you need to go to We Are That Family! 

One of my favorite things in the summer is to make a few dips, and have that, chips, and bbq chicken & veggies.  Decided to share two of my favorite dips today (couldn't pick just one).  They are even better if you make them a day, or even a couple hours ahead.  But, if you are like me, they are good after they chill in the refrigerator.  Hope you enjoy!

Bean Dip Like the One You Can Buy at the Store that NEVER Goes On Sale :)

  1. Combine refried beans with the other ingredients in a food processor.
  2. Puree ingredients on high speed until smooth.
  3. Cover and chill for at least an hour before serving.
Easy Peasy Ole Dip

  1. In a small bowl, combine all of the ingredients.
  2. Beat till smooth and creamy.
  3. Cover and refrigerate several hours, till flavors are blended.
  4. Serve with assorted raw veggies or tortilla chips.

Ohhh Lamp, how do I love the?

Okay,
So, I have been a bit obsessed with decorating lately.  I blame spending the past 10 months working on my masters, and spending every spare minute working on schoolwork (one hour a week my tush... when they presented the program that is what they said)- more about that later).  Only 10 more months to go

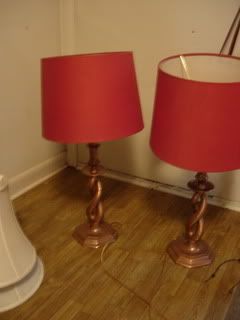
Anyway, I was surfing a local craigslist-copy cat site and saw someone offering a set of lamps with the shades for $10.  I thought she meant each, and asked her if she would take less.  She emailed me back that she would take $7 for the pair.  Score!  When I got them, I was a bit taken aback, because the gold was a lot more shiny in person, and the shades had seen better days.  I put them beside the bed, and waited (figured I would strip the shade & recover).  A few days later, I saw a girl had the CUTEST shades that matched my bed set for $10.  That was a bit more than I usually spend, so I asked her if we could work out a deal.  By the time all was said and done, I got both of them, and a plant rack for $8!

Took the shades, swapped them out, and gave the lamps a shot of copper spray paint.  

What the lamps originally looked like:


Original gold lamp with new shade:


Lamps painted:


Lamp turned on at night beside bed:


  Here is what they look like beside my bed.  The basket holds all my school books & was .99 at Goodwill, as was the iron basket.  I found the smaller one (that I am using as a candle holder) at a Goodwill clearance center in "the big city" (where like I posted below, they charge by the pound. This added a bit of weight).  Everything is sitting on one of the end tables I scored for $20 off of the same site. I filled in the 80's wood carvings and painted it a chocolate brown.  The paint is still a bit tacky though.  Everything I paint turns out that way (with real paint- spray paint is fine).  Anyone know why?

So, I figure I spent about $15 for both lamps.  More than I wanted to spend originally, but I love them!   

Tasty Tuesday: My Favorite Smoothie!

Today I am joining in with Tasty Tuesday at Balancing Beauty and Bedlam
There are some great recipes!  Check them out! 

Since it has been so hot out, I decided to share a smoothie recipe that is rather thrifty (IMO).  It is a bit different than your usual smoothie.  

Blueberry Pineapple Smoothie

  1. Put all ingredients in blender.
  2. Blend until smooth.
  3. Serve immediately.
  4. Serves 1.
I usually add in some crushed ice (if it isn't icy/cold enough).  I have also subbed apple juice for the yogurt, and added in ice.  

Hope you try it and like it! 

Monday, June 29, 2009

Looking For Opinions...

I found these 2 great pieces at (you guessed it) Goodwill yesterday.

The first is a planter (or a junk holder :) )  I originally picked it up because of the lion heads on the sides.  Then I noticed the design on the sides (which is what I am redoing my living room in).  Here is the problem... I am not sure about it now.  Thinking about spray painting it or something.  Any opinions?  Was thinking about putting some type of plant inside (I have NO plants inside of my house now, would like to try and have some).  If I paint it, then I could probably use it for something else.   It is rather large (10 in by 10 in or so).  


Also, I spotted this and loved it (the top comes off and you can put four pictures inside).  It was marked .99, but today green tags were 1/2 off!!!  .50- who can beat that?  I am not sure about the green/gold/brown on it though.  Thinking about doing dark brown with some copper accents, or maybe creme with dark brown smudged on the edges, but I am afraid I will paint it, and then I will have painters remorse...  So, should I leave it alone or paint? 


So, what would you do with these two pieces... Thanks for the ideas! 

So Many Treasures!

I have loved following around all of the posts on Southern Hospitality.  You have to check it out!  

Well, I have been on a treasure finding mission lately.  One of the joys of summertime! 
I have found ton of good deals, but here are a few that I found at Goodwill while on vacation :) Will share more throughout the week! 

I am apologizing now for the junky photos :)  My cameral is old, and I waited until tonight to take pictures. 

This is a candle holder- was marked 2.25, and had a price tag for $15 on the bottom. 


I thought this would be cute with something else... don't know what yet.  Was marked $1.25 and had a Target 5.99 price tag on the bottom.  

This candle holder was marked .75 :)  Think it needs some paint of some kind.

Also wanted to share 2 projects I did recently: 

The cup was .99 at Goodwill, the bird was .25 on 1/2 off day (spray painted it creme), and I made the "nest" out of a long boa type cloth I found at the Goodwill clearance center.  They sell things by the pound- if you have never been you have to find one and go!  Tons of treasures to be had!


I bought this for .99 also (bet you can guess where!) It was sad looking, but love it with the spray paint.  Not sure where I am going to put it, or what I will put in it.  


Welcome

Hello,

This is my first foray into blogging.  Guess I could say longtime watcher, first time poster.  Like my title says, I am a thrifty teacher lady.  I love to coupon, craft, read, and spend time relaxing.  Welcome to my blog!